How To
How to remove preinstalled apps from Windows 11
- March 9, 2022
- Updated: July 2, 2025 at 3:54 AM
The release of Windows 11 caused great excitement worldwide, although it needs many special requirements to run on your PC. These include 64 GB of storage, as much as 4 GB of RAM, and at least a two-core processor. It also only works on a 64-bit system, so if you have a 32-bit system on your PC, you won’t be able to switch it to run on Windows 11.
But if you do have the system requirements, it’s a welcome upgrade because it comes with many built-in features like Microsoft Teams and Widgets in a taskbar that allow you to add shortcuts. But what if you want to remove the preinstalled apps from Windows 11?
Built-in programs and apps you might not want
You might have advertising software installed on a PC or laptop you bought already set up. There will also be programs, Windows Store apps, System apps, and Windows updates you might not want or need on your device. You can uninstall most unwanted apps with just a click, but others could be more complicated to remove from your system. There are different methods you can use to do so. Here are a few of them with step-by-step guides on how you can make them work.
Method 1: Uninstall from Settings
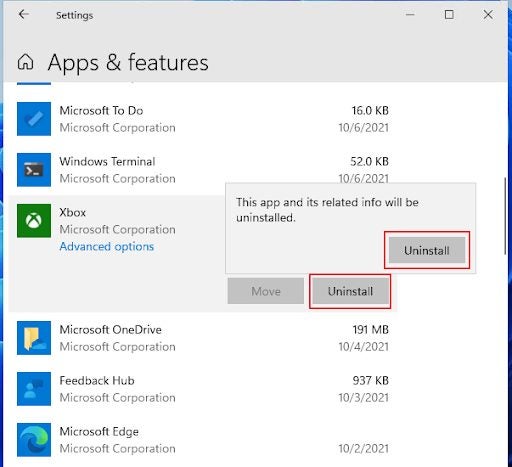 Open Windows Settings and click on apps. Scroll to the apps list, find or search the app you want to delete. Double-click on it, and you’ll see an Uninstall option. Click on it and again on the confirmation prompt.
Method 2: Uninstall from the Start Menu
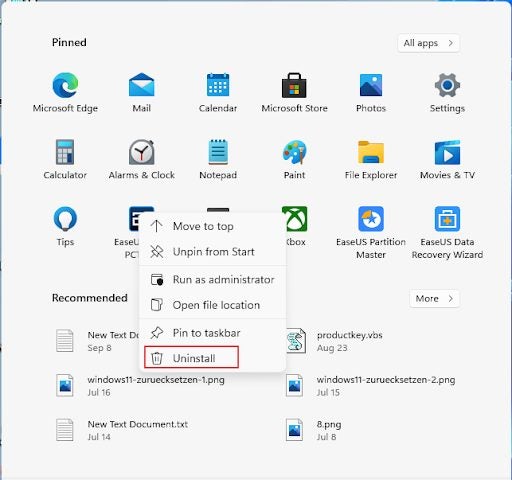 Click the Windows icon to open the Start menu, where all the apps on the PC are listed. Find the app you want to uninstall, right-click on it and choose the Uninstall option. If the app is from the Microsoft Store, you’ll see a window telling you the app and its related information will be removed. Click Uninstall again.
Method 3: Uninstall from the Control Panel
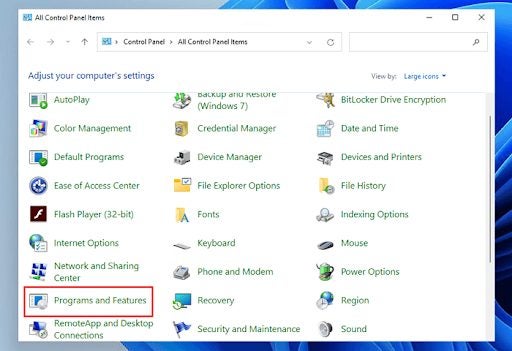 In the Control Panel, select Programs and Features. In Programs and Features, you’ll see all the installed apps on your computer. Right-click on the one you don’t want and click Uninstall. A window will pop up asking if you want to make changes to your device. Click Yes in reply, and it will uninstall.
Method 4: Uninstall Using PowerShell
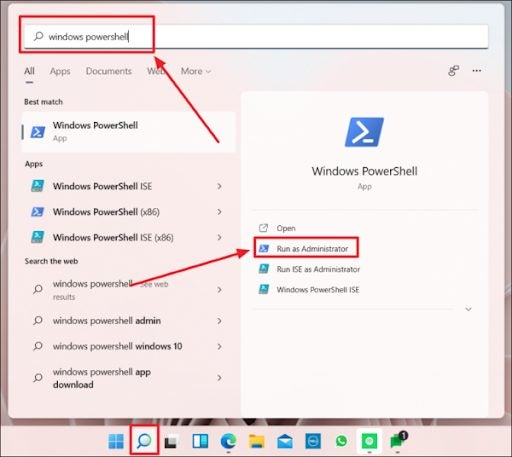 The methods mentioned earlier may not be effective for all preinstalled applications. That’s where Windows PowerShell comes in.
Click Search in the taskbar (or hold the Windows key+X and choose Search from the pop-up menu). Type Windows PowerShell in the search bar. You’ll have to run PowerShell as an Admin to remove built-in apps. Click Run as Administrator to do so.
Copy the command from the list below that’s appropriate for the built-in app you want to uninstall and paste it on the PowerShell page and press Enter.
– Alarms and Clocks – Get-AppxPackage *windowsalarms* | Remove-AppxPackage
– Calendar – Get-AppxPackage *windowscommunicationsapps* | Remove-AppxPackage
– Calculator – Get-AppxPackage *windowscalculator* | Remove-AppxPackage
– Camera – Get-AppxPackage *windowscamera* | Remove-AppxPackage
– 3D Builder – Get-AppxPackage *3dbuilder* | Remove-AppxPackage
– Get Started – Get-AppxPackage *getstarted* | Remove-AppxPackage
– Get Help – Get-AppxPackage *gethelp* | Remove-AppxPackage
– Photos – Get-AppxPackage *photos* | Remove-AppxPackage
– Microsoft Store – Get-AppxPackage *windowsstore* | Remove-AppxPackage
– Maps – Get-AppxPackage *windowsmaps* | Remove-AppxPackage
Method 5: Uninstall Using the Registry Editor
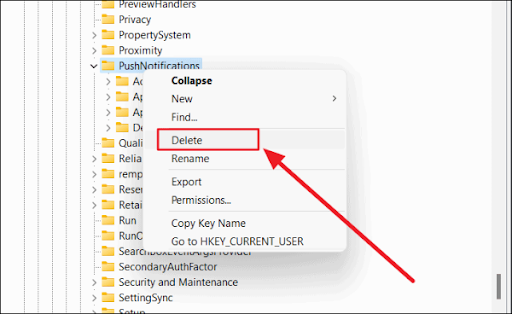 This method can work with apps or programs that stubbornly resist being removed! But remember, you should only use the Registry Editor when nothing else works. Opening it and making changes can possibly cause damage to your system.
Hold down the Windows and R key to open the Run application. In the Run box, under Open, type Regedit. This will get you into the Registry Editor. Press Yes in the prompt that you see next. The Registry Editor page will open. Take the following course: HKEY_LOCAL_MACHINE > SOFTWARE > MICROSOFT > WINDOWS > CURRENT VERSION, to delete the applications you don’t want.
Right-click the app you want to get rid of and click Delete from the pop-up menu. You’ll be asked to confirm whether you want to permanently delete what you have chosen. Click Yes.
Adapt Windows 11 to your needs
Many changes have been made in the long-awaited and exciting new operating system, Windows 11. Firstly, the desktop looks different. The taskbar is in the center, and the user interface (UI) design has been altered. There are also great preinstalled programs and apps. However, if you don’t want to use them all, there are different ways to remove them from your system.
Of course, you can’t just delete the desktop icon. You have to uninstall to completely remove a program or app, including all the program and configuration files. We hope our guide has made it easy for you to choose the best method to uninstall what you don’t want or need.

You may also like
 News
NewsThe writers of The Last of Us are not clear on the structure that the next season will follow
Read more
- News
The thriller with Rami Malek that is already available on Disney+ and that will brighten your summer
Read more
- News
Simon Cowell will return to music reality shows, but this time on Netflix
Read more
- News
Could Malcolm Beck return to Yellowstone after all? The actor who plays him would be willing
Read more
- News
Golden Kamuy will bring not one but two movies as a prelude to the fifth season
Read more
- News
'Jaws' turns 50 years old making us a little scared to enter the sea
Read more